Showing posts with label Tasty Tuesday. Show all posts

Saturday, February 8, 2020

Sourdough: How to Get Started

Sourdough Starter


My sourdough adventure started with a request from my husband for a thick, crusty bread to eat with soup. I quickly got discouraged while looking for recipes online. All the recipes seemed so complicated, and the sourdough community seemed a bit snooty and confusing. ðŸ™‚ They all used special flours and terms I didn’t understand, and made it sound like keeping your sourdough alive was a tricky business and required a lot of attention.  

A friend of ours gave us some sourdough starter, and I found a recipe that had a lot of pictures and made some sense to me. And guess what? It worked! I made a beautiful loaf of thick, crusty bread that tasted amazing too! Using just white flour, water and salt!

Sourdough is good for so many recipes: breads, pretzels, pancakes, English muffins, etc. And did you know that even if you’re gluten-free you may be able to eat sourdough bread? The carbohydrates and proteins in the wheat get broken down and made easier to digest. 

I have come to realize that there is a lot of wiggle room with the sourdough recipes and how you handle the starter. It’s actually pretty low maintenance and doesn’t have to be treated with precision.  You do have to plan ahead for many of these recipes, but it’s definitely worth it!

So now you probably want to eat some sourdough, but maybe you don’t have a friend to share a starter with you. Start your own! This recipe uses simple ingredients, and only takes 5-7 days to start, and you only need to feed it once a week! 

To make a sourdough starter, start with a large jar or container. Take 1/4c of water and 1/4c + 2tbsp of flour, and mix it well. Cover it with a tea towel or cheesecloth and let it sit in a warm-ish place (the top of the fridge is a great place). Every 24 hours, add another 1/4c water and 1/4c flour. Continue to do this for 5-7 days, until a small spoonful of your starter floats in a cup of water. 

If you are having trouble getting your starter going, try feeding it every 12 hours instead. 

Once your starter passes the float test, it is ready! Use some now to make some delicious bread or pancakes, and put the rest in the fridge. 

Each time you use your starter, take it out of the fridge and feed it. Aim for at least once a week (but I’ve let mine go almost 2 weeks before 😬).  I take my starter out, pour half into a bowl. I add 1/2c water and 1/2c of flour to the bowl and let it sit until it’s ready to make bread, and then I add 1/2c water and 1/2c flour to the jar and put it back in the fridge. 

If your starter gets a brown liquid on top, that’s means it’s hungry! I usually pour that liquid off the top before I feed the starter again. 

So go mix up a starter and let it start the souring process! Over the next few weeks we will be sharing some of our favorite sourdough recipes! 

-Kayleigh 

Tuesday, November 8, 2016

Best Pumpkin Bread Recipe


For most of us, the fall season is upon us. Nothing says fall like pumpkin bread but even better to find a little more healthy version of it to bake for our families.


Ingredients:

3 cups whole wheat flour
2 1/2 cups raw organic sugar
1 1/2 tsp. sea salt
2 tsp baking soda
3 tsp pumpkin pie spice
4 eggs
2/3 cup water
1 cup coconut oil (melted)
1 cup pumpkin puree (homemade or canned)


Directions:

Pre-heat oven to 350 F (160 C). Mix together dry ingredients and wet ingredients separately. Then combine slowly in your mixer, and mix until well blended. Grease two medium sized bread pans with a little coconut oil and our the batter into the prepared pans.

Bake for about an hour or until a toothpick inserted into the middle of the bread loaf comes out clean.


Tuesday, October 11, 2016

Chicken Cordon Bleu Lasagna


This Chicken Cordon Bleu Lasagna was originally posted here. I have been wanting to make Chicken Cordon Bleu but am trying to get away from some of my more time consuming meals since making everything from scratch demands lots of time in the kitchen as it is! For me, using lasagna noodles that do not require pre-cooking can help cut the time required to make this meal down and I making it into a lasagna makes it a more filling meal for my two teenage boys who simply can't get enough food!


Cordon Bleu 


Ingredients:

9 lasagna noodles, cooked according to package directions (I use the kind that does not require pre-cooking)
4½ cups cooked and chopped chicken, grilled or rotisserie chopped
1½ cups cooked and diced ham
1½ - 2 cups cooked and chopped bacon
3 cups Swiss cheese, grated ( I use Gouda or Tilster as Swiss is not easily available for me)

SAUCE
½ cup butter
½ cup flour
4 cups milk
1 teaspoon garlic powder
1 teaspoon garlic salt
½ teaspoon salt
¼ teaspoon white pepper
16 ounces cream cheese, softened

Instructions:
In a large saucepan melt butter and add flour. Cook for 1 minute and then slowly add milk. Add garlic powder, garlic salt, salt and pepper. Stir with a whisk and bring to a boil over medium high heat. Stir in cream cheese and continue to stir until smooth. Remove from heat.
Preheat oven to 160 degrees Celsius (350 degrees F).
Spray a 9x13 inch baking dish with cooking spray or grease lightly with margarine.

TO ASSEMBLE:
Place 3 lasagna noodles on the bottom of the pan.
Layer ⅓ of the chicken over the noodles.
Next layer ⅓ of the ham.
Pour ⅓ of the sauce over the ham.
Next sprinkle ⅓ of the cheese over the sauce
Finally sprinkle ⅓ of the bacon over the cheese.
Repeat 2 more times.
Bake at 160 degrees C (350 degrees F) for 45 to 60 minutes.


Tuesday, October 4, 2016

Roasted Cauliflower Recipe


Ingredients:
Cauliflower florets (you can buy them already cut or buy a whole one and cut it yourself)
Olive oil (enough to lightly coat the cauliflower)
Salt, to taste
Pepper, to taste
Other seasonings (optional)

Directions:

Preheat your oven to 425 degrees.

In a large bowl, mix the cauliflower florets, olive oil, salt, pepper, and any other seasonings you want to add. Place the florets on a cookie sheet so that none of the pieces of cauliflower are touching each other. Bake for around 25 – 35 minutes until part of the cauliflower florets are a nice golden brown. You can make them as dark or as light as you want them.

http://www.survivingthestores.com/roasted-cauliflower.html

Monday, June 20, 2016

Red Party Punch Recipe


Missionaries can often be found planning parties for baby showers, wedding showers, their own children's birthday parties, etc. For quite some time, I have been on the hunt for a good punch recipe which does not require many special ingredients so that it can be made on the field. With the need to plan a high school graduation reception for our daughter, I was happy to find an easy punch recipe that everyone enjoyed. I tweaked the recipe a bit from the original recipe I found online so that is the version I will share here. It reminds me of red Hawaiian punch to give you an idea of the flavor of the finished product.

Just a stock photo. :)


Ingredients:
Better to allow the ingredients to chill a few hours before mixing. 

8 cups orange juice (2 liters)
8 cups pineapple juice (2 liters)
2 cups grapefruit juice or grapefruit lemon juice blend
1/2 liter of Grenadine
1 (10 ounce) jar maraschino cherries (optional: we did not use the cherries)
1 (2 liter) bottle Sprite


Combine the ingredients into an 8.5 or larger punch bowl. Stir lightly and serve!


Tuesday, June 14, 2016

Chunky Homemade Peanut Butter


Yield: About one jar of chunky peanut butter

Ingredients

4 cups (1 lb.) roasted, unsalted peanuts - divided
1 teaspoon honey
1/2 tsp. salt
1-2 Tbsp. canola or peanut oil (Optional - it makes the peanut butter much easier to spread after it has been refrigerated)

Instructions:

1. Blend 3 cups of the peanuts in a food processor for up to 10 minutes, until the peanut butter is very creamy and well-blended.
2. Roughly chop the remaining one cup of peanuts.
3. Mix in the one cup of roughly chopped peanuts, oil, honey, and salt. Adjust to taste.

Enjoy!

Note: If you prefer creamy peanut butter you can process all four cups of the peanuts in the food processor. The amount of honey are salt are adjustable, so feel free to add more or less to change the sweetness or saltiness of the peanut butter.

Tuesday, May 24, 2016

Russian pancakes (blinchiky)


I had tried and tried to make "blinchiky" the way friends give me the recipe (just throwing the ingredients into a bowl and not really measuring any of them) but I could not get them to turn out. I ended up spending way too much time making a mess of batter in a skillet. Frustrating! I just knew it didn't take that long to make these thin little 'pancakes' and set out to find a recipe. I ended up trying this crepe recipe which turned out wonderfully! They were thin, easy to cook and flip in the skillet and tasted great. So, I use this recipe below to make 'blinchiky'. This recipe is way more fool-proof than guessing at the ingredients each time. 


1 1/2 cups milk
 2 tsp. vanilla extract
3 large egg yolks 
2 tsp. sugar 
1 TBSP salt 
5 TBSP butter, melted plus more for pan
1 1/2 cups sifted all-purpose flour 

1. Whisk together milk, vanilla, yolks, sugar, salt, and butter until well combined. Slowly whisk mixture into flour until smooth. Transfer to an airtight container; refrigerate at least two hours or overnight. 

2. Once the batter has set and you are ready to fry them, lightly coat a 6 -1/2 to 7-inch crepe pan or non-stick skillet with butter. Place over medium heat until just starting to smoke. Remove from heat; pour 2 to 3 tbsps of batter quickly into center of pan. quickly tilt pan and swirl in all directions so batter covers bottom in a thin layer. Return pan to heat; cook until center is dry, about 1 minute. Jerk pan sharply back and forth to loosen blinchik. 

3. Lift edge of blinchik; when underside is golden brown, flip with your fingers or two spatulas. Cook until top is brown in spots, about 30 seconds more. Slide onto plate. 

4. Coat pan with butter again and repeat with remaining batter. layering blinchiky on a plate. To keep warm, cover with an inverted oven-proof dish and place in a 200 degree C oven.

Russian people love to eat blinhiky with different fillings, including everything from 'varenya' (fruit jams) to chicken and mushrooms. So, choose your filling or just scarf them down by the handfuls like my teenage boys do! :) However you like to eat them, enjoy! I would love to hear what are some of your favorite filings!


Tuesday, May 10, 2016

Italian Quiche (with tomato, basil, and garlic)

Depending on the size of your family, this recipe can be served as lunch or a light dinner meal. This is a delicious quiche that makes your house smell delicious!


SERVES: 8
PREP TIME: 20-25 minutes
BAKE TIME: 50 minutes
Preheat oven to 180 C (350 F)

Ingredients:

1 prepared 9-inch pie shell (I make mine from scratch following this recipe)

1 1/2 cups sour cream

1/2 cup evaporated milk (I have omitted this if not available)

1/2 cup grated Parmesan cheese, divided

4 large eggs, beaten

1/4 tsp. salt

1/4 tsp. ground black pepper

3 tablespoons seasoned, dry breadcrumbs 
(I use small seasoned salad croutons commonly sold here in Russia)

1 tsp. dried basil leaves, crushed

3 cloves garlic, finely chopped

1 3/4 cups fresh or canned diced tomatoes, drained

1/4 cup ripe olives, chopped (optional)


Directions:

Whisk sour cream, evaporated milk, 1/4 cup grated Parmesan cheese, eggs, salt, and pepper in medium bowl; pour into pie shell. Combine remaining cheese, breadcrumbs, basil, and garlic in small bowl; sprinkle over sour cream mixture. Top with tomatoes and olives.

**I allow the quiche to bake for about 5-10 minutes before sprinkling on the cheese, breadcrumbs, basil, and garlic mixture, as well as, the tomatoes and olives. This prevents them sinking too deeply into the quiche during baking.

Bake for 50-60 minutes or until knife inserted near center comes out clean. Remove from oven. Allow to cool on a wire rack for 5-10 minutes before serving.


Note: The quiche will "poof" up while baking but will shrink back down to its original size once you remove it from the oven.


Tuesday, May 3, 2016

Homemade Cheez-It Cracker Recipe

This week I am just passing along a recipe I found while searching the internet to find a snack food my husband loved and missed from the States. I originally found this recipe here. Although there are several variations of how to make homemade Cheez-it crackers, I know this one works and tastes great.


Author: Veronica

Prep time: 10 mins
Cook time: 15 mins
Total time: 25 mins


Ingredients

2 Cups Sharp Cheddar, shredded ( I used Gouda)
¾ Cup flour, plus more for dusting
4 tablespoons butter, softened and cut into 4 pieces (I use unsalted butter and add 1 teaspoon salt to it)
½ teaspoon kosher salt
½ teaspoon freshly ground black pepper
1 tablespoon whole milk


Instructions 
**(I apologize for not having any photos to show of this process. If you follow the link above you can see photos of each step.)

Preheat oven to 160 degrees Celsius (350 degrees F).
In a food processor or using a handheld electric mixer as I did, combine the cheese, butter, flour, salt and pepper in 5-second pulses until the mixture resembles coarse crumbs.
Add the milk and process until the dough forms a ball, which takes about 10 seconds.
On a lightly floured surface, using a lightly floured rolling pin, roll the dough into a 13×7 inch rectangle that is about 1/16″ thick. I used a pizza cutter to trim off the sides but if you have a serrated cutter you can use it to make the serrated edges of the crackers.
Next cut the dough into 1×1 inch squares.
Transfer the crackers, carefully, to a parchment-lined large cookie sheet.
Using the dulled end of a skewer make a hole in each cracker and sprinkle with coarse sea salt.
Bake the crackers on the middle rack for 15 minutes, or until the ends are barely browned.
Remove from the oven and allow to cool thoroughly on the cookie sheet. (Tip: remove crackers when they are still light as they will darken when cooling on the cookie sheet.)
Serve at room temperature and enjoy.


Tuesday, April 26, 2016

Chicken Cordon Bleu Casserole


If you love Chicken Cordon Bleu but just don't have the time to make the original dish this recipe is an easier version to give you the taste you want in less time!


Ingredients:

4 boneless, skinless chicken breasts, cut in half
12 slices of thin sliced ham
1 1/2 cups swiss cheese, shredded (replace with Gouda or another available cheese)
3 Tbsp. butter, melted
1 cup of buttery crackers, crushed (I think bread crumbs would work great)
3 Tbsp. grated parmesan cheese
1/2 tsp. salt
1/8 tsp. pepper
Sauce Ingredients:

3 Tbsp. butter
3 Tbsp. flour
1 cup milk
1/2 cup chicken broth
1/2 Tbsp. Dijon mustard
1 tsp. Worcestershire sauce


Instructions:

Preheat the oven to 350 degrees and coat a 9 x 13 baking dish with cooking spray or margarine.
Layer the chicken in the bottom of the baking dish. Next, layer with ham slices and then cover with shredded cheese.
In a medium bowl, blend the crushed crackers, grated Parmesan, salt and pepper. Sprinkle the cracker mixture over the cheese to create the next layer.
Pour melted butter over the top of the casserole and bake for 30 to 35 minutes until juices run clear and cracker crumbs are browned a bit.

Sauce Instructions:

Create the sauce by making a rue. Melt the butter in a saucepan slowly. Whisk in the flour and cook for just a couple of minutes. Remove from heat, then slowly pour in the chicken broth and milk. Make sure to continue whisking for about 5 minutes or so as the sauce thickens.
Remove the sauce from the heat and stir in the Dijon, Worcestershire, and salt and pepper to taste.
Top each serving of the casserole with the warm creamy sauce. Enjoy!


Tuesday, April 19, 2016

Homemade English Muffins


Original recipe found here: http://www.bakedbyanintrovert.com/homemade-english-muffins/


Ingredients:

2 cups whole milk

3 tablespoons honey

2-1/4 teaspoons active dry yeast

1 large egg, room temperature

4 tablespoons unsalted butter, melted

5-1/2 cups bread flour

1-1/2 teaspoon salt

cornmeal for dusting


Directions:

Heat the milk and honey in a small saucepan over low heat until it reaches 105 - 115 degrees F (40-45 degrees C). Remove from heat, stir in the yeast, and allow to sit for 5 mins before whisking in the egg and melted butter.
Add the flour and salt to the bowl of a stand mixer or pour into a large bowl to mix with a wooden spoon. If using a stand or hand mixer, attach the dough hook attachment/s. Turn the mixer on low speed and gradually pour the milk mixture into the flour. Continue to beat on low until the flour is incorporated, stop and scrape down the sides and bottom as needed. Turn the speed up to medium and mix for 4 minutes, until dough is smooth and sticky.
Scrape the dough out into a lightly oiled bowl. Brush a little over the top of the dough. Cover and set in a warm place to rise for 1 hour or until doubled in size.
Turn the dough out onto a lightly floured surface, gently knead the dough together. (The dough will be very sticky. Add just enough flour to make it easy to handle.) Divide the dough in half and then each half into 8 equal sized pieces. (If you want smaller muffins, divide each half into 12 pieces.) Roll each piece into a ball and flatten then ball into a disk. Place the disks on a cookie sheet lined with parchment paper that has been dusted with cornmeal. Sprinkle more cornmeal over the tops. Cover with a lint-free towel and set in a draft-free place for 1 hour, or until doubled in size.
Preheat the oven to 325 degrees F (160 degrees C).
Heat a griddle or skillet over medium-low heat. Gently lift each disk with a plastic spatula and place it on the griddle. (Handle the dough with care so you don't cause them to 'fall') Cook them until lightly browned on both sides, approximately two minutes per side. Place the muffins back on the cookie sheet and bake them for 10 minutes.
Split the English muffins with a fork and serve warm with your favorite jam or butter. The muffins are good for up 5 days stored in an airtight container. They can be wrapped in plastic wrap, sealed in a zip-top bag, and frozen for up to 3 months.


Wednesday, April 13, 2016

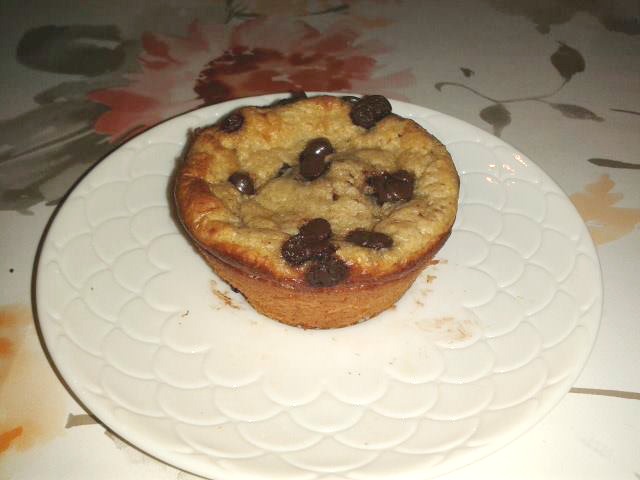
Blender Banana Oatmeal Muffins


A few months ago I found a recipe similar to this one but when I tried baking the muffins, they completely flopped. Recently, I have begun my journey to healthier eating and was really wanting to begin making new recipes that I can enjoy - guilt-free! I found this recipe, very similar to the one I had tried months ago on the blog, Well Plated by Erin.  


Made without butter or oil, these moist and healthy banana oatmeal muffins are made in the blender and are a delicious breakfast or snack!


YIELD: 12 muffins

COOK TIME: 15 minutes

TOTAL TIME: 40 minutes
Ingredients:

2 cups oats (quick cooking or old fashioned)
2 large very ripe bananas
2 large eggs
1 cup plain Greek yogurt
2-3 tablespoons honey (I used two and they tasted sweet enough for me)
1 1/2 teaspoons baking powder
1/2 teaspoon baking soda
1/2 teaspoon pure vanilla extract
1/8 teaspoon kosher salt
Up to 1/2 cup mix-ins: chocolate chips (mini or regular), chopped dark chocolate, nuts, dried cranberries, or blueberries (fresh or frozen)

Directions:

Preheat the oven to 400 degrees. Lightly grease a 12-cup standard muffin tin or line with paper liners. If using liners, lightly greasing them as well. Set aside.
Place the all ingredients but the mix-ins in a blender or the bowl of a food processor fitted with the steel blade: oats, bananas, eggs, Greek yogurt, honey, baking powder, baking soda, vanilla extract, and salt. Blend or process on high, stopping to scrape down and stir the ingredients once or twice as needed, until the batter is smooth and the oats have broken down almost completely, about 3 minutes. By hand, stir in the mix-ins.
Divide the batter between the prepared muffin cups, filling each no more than 3/4 of the way to the top. Sprinkle with additional chocolate chips or nuts as desired. Bake for 15 minutes, until the tops of the muffins set and a toothpick inserted in the center comes out clean. Place the pan on a wire rack and let the muffins cool in the pan for 10 minutes. Remove from the pan and enjoy!
NOTE: I ate one after it had cooled for ten minutes in the pan but I think these muffins hold together best when cooled completely.


Wednesday, April 6, 2016

Spicy Cheese Straws

A simple recipe for a great snack food that can be taken to parties or just made at home for the family.


1 1/2 cup butter or 1/2 c. shortening
1 lb. grated sharp cheddar cheese (I substitute with Gouda but other cheeses can also be used)
2 1/2 cups flour
1 tsp. salt
1 tsp. dry mustard
3/4 tsp. cayenne pepper

Add all ingredients into a mixing bowl. After combining ingredients well with a mixer, knead ingredients into a smooth dough. Shape into either skinny straws or into 1/2 inch wide by 1 1/2 inch wide "sticks" and place one inch apart on an ungreased baking sheet. Bake at 350 degrees F (170 Celsius) for 12-15 minutes or until they start to turn golden brown (the skinnier you shape them the less time they will need to bake). Allow to cool a few minutes on the baking sheet then transfer to a cooling rack. They are yummy hot and/or cool! Store in an airtight container up to two days.

Wednesday, March 30, 2016

Tasty Tuesday -Traditonal Easter Foods from Around the World


With Easter celebrated from last week until May first in some countries, the BMW ladies thought it would be interesting to share with our readers a few traditional dishes enjoyed in our countries during Easter. We posted the links to recipes for a few of them in case you would like to try them out for yourselves.


Nicaragua


Almibar is a popular dessert during Holy Week, made with jacote, mangoes, sometimes papaya, and lots of sugar!


Paraguay


At Easter they bake and eat alligator shaped bread called chipa, or Easter Breakfast Bread. Here is a little bit of an Americanized version of the recipe so you can try making this bread. I just love the alligator shape! I have read that different areas of Paraguay have their own shape of chipa bread. As I did research I found that often people make it round similar to a doughnut.


Dominican Republic


Semana Santa (Holy Week) is the biggest holiday of the year. Good Friday is the big celebration. They eat Habichuelas con Dulce (sweet Beans). This recipe is definitely an interesting combination of ingredients. Take a look at the process involved in making it and find the recipe here.


Mexico


A traditional Easter dish in Mexico is Capirotada, a Mexican bread pudding made with cinnamon, piloncillo, cloves, raisins, bread, and cheese. Many Mexican and Mexican-American families view this dish as a reminder of the suffering of Christ on the cross. The ingredients in this recipe carry a rich and symbolic representation. The bread is for the Body of Christ, the syrup is his blood, the cloves are the nails on the cross, the cinnamon sticks symbolize the wooden cross, and the melted cheese stands for the Holy Shroud.


Jamaica


It was a tradition to exclude meat from the diet for the Lenten period (forty days after Ash Wednesday) and many still keep the tradition of not cooking on Good Friday. Fish is the main staple of almost every household. Cheese and fish are eaten at the Good Friday church service.


Canada 


Hot Cross Buns are a tradition in Canada, as well as, other countries across the globe.


Russia


Paska Easter Cakes or "Kulich"  are baked at home and sold in stores during the Easter holiday. They are "blessed" by the Orthodox priests before they leave the bakery and sold in stores.


We hope you enjoyed our trip around the globe taking a look at different traditional foods of Easter celebrations! Be looking for another Easter post where we will share other Easter traditions of different countries, coming soon!


Wednesday, March 16, 2016

Cheeseburger wraps


I originally saw this recipe here when I was searching recipes myself for something new to make with ground beef. These are great for lunch or even a quick Wednesday "just before church" meal. If you can purchase tortillas on your field, they would speed this recipe up even more. My family prefers homemade tortillas so we are using them for this recipe. You can find the recipe for them here if you decide to make the tortillas from scratch but, remember that homemade tortillas are thicker and more difficult to work with for this recipe.


Ingredients:
1 lb ground beef
2 tablespoons ketchup
1 tablespoon mustard
1 teaspoon dried minced onion (I used onion powder to season the meat)
1 tablespoon Worcestershire sauce
salt and pepper to taste
5 flour tortillas
1 1/2 cups cheddar cheese
additional hamburger toppings you like (tomatoes, lettuce, pickles, ketchup, mustard, etc)

Directions:
In a large skillet, brown hamburger until no longer pink. Add ketchup, mustard, onion, Worcestershire sauce, and salt and pepper and cook for about 2 minutes, until all combined.
Take a tortilla and line the middle with a small amount of cheddar cheese. Add some cooked hamburger beef and then top with your favorite hamburger toppings. Roll the tortilla up and tuck in the ends (like a burrito). You can either eat as is or throw on a grill pan for 3-5 minutes until slightly browned.


Tuesday, March 1, 2016

Green Chile and Rice Casserole

This is my adaptation of a great side dish recipe I found online. You can adjust it as needed to make it more cheesy, more spicy, or with more sauce.


Ingredients
 2  cups (approx.) of rice or rice blend of your choice - instant or cooked
2 (8 ounce) containers of sour cream (lowfat if desired)
4 ounces chopped green jalapeno peppers, drained (more can be added to increase the 'heat')
3-4 cups of shredded Gouda cheese (lowfat if desired)


Directions

Prepare the rice according to package directions.
Preheat oven to 325 degrees F (165 degrees C). Lightly grease a medium baking dish.
Spread 1/2 the cooked rice mix over the bottom of the prepared baking dish. In a bowl, mix the sour cream and green chilies. Spread 1/2 the sour cream mixture over rice, and top with 1/2 the cheese. Repeat the layers.
Bake 25 minutes in the preheated oven, or until bubbly.


Tuesday, February 23, 2016

Homemade Beef Jerky

Beef jerky - one of the frequently requested items in missionary care packages. A craving that makes us experiment on the field. Some internet research and a few attempts in the kitchen later and we have a recipe that now is our favorite, even more loved than the packaged jerky in the States.

Step one - Choose a lean cut of beef.
Step two - Cut it cross-grain in order to make it easier to chew once it is dried.
Step three - Prepare marinade.

Marinade instructions per one pound of beef

4 tsp. salt
2 tsp. black pepper
1 tsp. chili powder (less depending on desired flavor)
1/2 tsp. garlic powder
2 tsp. liquid smoke
1/2 cup water

Mix marinade ingredients together. Pour marinade into a container and place slices of meat in marinade. Allow to marinade in fridge for 24 hours.

Once you are ready to dry the beef slices, preheat the oven to 150 degrees Fahrenheit (60 degrees Celsius) for a Convection oven. We pat off each slice with a paper towel to prevent the jerky from being too salty or spicy once it is dried. Place the slices of beef about an inch apart on an oven rack as pictured below. Be sure to place a drip rack underneath as the marinade will drip off while the meat is drying. Allow the meat to dry for 1 to 1 1/2 hours.

Note: Whether or not you pat the marinade off the meat before drying or how long you allow the meat to dry is all up to you. You can try this recipe and decide more or less on the ingredients and time allowed to marinade and dry per your desired flavor and texture.

Once the meat is dried, we store it in an air-tight Ziploc bag or container. It usually doesn't stay there very long!


Wednesday, February 17, 2016

Mushroom Mozzarella Bake


A friend posted this low carb recipe on Facebook and since it includes two things I love - mushrooms and cheese I wanted to share it with all of you. 
Bonus: it's low carb! 
Use it as a side, or just make it when you just get a craving for fresh mushrooms, as I often do. 

Ingredients:

1 lb fresh mushrooms, sliced (0.454 kg)
3 tbsp butter (45 mL)
3/4 tsp seasoning salt (3 mL)
2 tbsp whipping cream (30 mL)
1 tsp dried parsley (5 mL)
1/4 tsp black pepper (1 mL)
3/4 cup grated Mozzarella cheese (175 mL) **You can also make this with cheddar cheese as well!

Directions:

Preheat oven to 350°F (180°C).
In large frying pan or electric frying pan with lid (slightly ajar), fry mushrooms in butter over medium heat until softening. Keep cooking until water evaporates. Remove lid of pan. Add seasoning salt; stir-fry until mushrooms are nice and brown. Add whipping cream, parsley and black pepper. Allow to simmer over low heat until whipping cream reduces a bit. This can happen extremely fast. Arrange mushrooms in shallow casserole dish. Sprinkle with cheese. Bake 10 minutes, or until cheese is melted.


Wednesday, February 10, 2016

Homemade Spice Recipes

This post is not one recipe but a link to a list of homemade spice recipes that I stumbled upon a few weeks ago. Missionaries, in most countries, cook completely from scratch (which is a blessing that we can avoid many food additives and extra "stuff" that comes with pre-mixed convenience foods) and we are always looking for new ways to season meats and veggies or to even make a copycat recipe of some foods we miss from "back home". I pray this list is a blessing and a help in your meal planning and preparation.

Enjoy! It is printable in English and Spanish!

http://myfoodstoragecookbook.com/2016/01/26/46-homemade-spice-mixes-printable-english-spanish/


Tuesday, February 2, 2016

Homemade Onion Soup Mix

I stumbled upon this recipe as I was searching for something else the other day and was glad to find a new recipe for a pantry staple that we use in many recipes. I hope it is a help to you!


Ingredients:

1/4 cup dry onion flakes (also called dehydrated onion)
1 tsp. salt
1 tsp. thyme
1 tsp. paprika
1 tsp. dry mustard
1 tsp. garlic powder
1/4 tsp. black pepper

Instructions:

In a small mixing bowl, combine all the ingredients.
Store in an airtight container
To use, stir into recipes as you would commercial onion soup mix (about 1 to 2 tablespoons per 1/2 cup sour cream for dip.)