(Apple Pumpkin and Harvest scents from Yankee Candle. YUM!)
Scented candles. They bring such joy to this home. Lighting one of my candles is like getting a breath of fresh air. Whether it be Apple Pumpkin that whisks us away to Fall in the mountains of Western North Carolina, or Bahama Breeze that almost makes us hear sea gulls and crashing waves on sand, scented candles teleport us to our happy places without even leaving the room.
But nothing quite brings a screeching halt to the trip down Happyville Lane like hearing the crash of a candle to the floor. (Face it. Sometimes a candle is more than just a candle on the field. So every broken candle hurts. They are irreplaceable in many countries... like ours.)
This has happened twice this year, both times from a sweet little boy who sometimes forgets where a good place to play is... and where it is not. Both times, he crumbled into tears. He knows how we all treasure their scents. And we cannot get scented candles here. (Yes, I plan on having a post on Lessons from a Broken Candle. But this post is about the practical instead of the devotional.)
So what did I do?
I put on my Super Mommy cape and glided in for the rescue... candle style.
All right, I have a broken candle jar. What do I do?
First thing, the glass has to be completely removed.
Take the candle and put it in a couple of plastic bags.
Take a hammer and gently tap the glass all around the bag to shatter the glass. Tap too hard and the glass embeds into the candle,making glass removal a little more annoying and difficult. Remove the glass gently into the bag. Toss the bag. Easy clean up!
When you have a clean candle, you are ready to start the repair. Pick a glass jar that is close to the same size. If you have an empty candle jar the same size, that would be ideal. For this Magnolia candle, I will use a large honey jar.
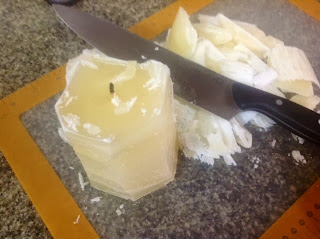
Shave the candle down so that it easily slips through the opening of the jar. Please do not think of doing what I did on my first attempt. I shaved the candle down to where it almost fit. I thought I would just shove it in... after breaking the jar and slicing my finger, I decided it was best to shave it to where it slips right in!
Place the shaved candle in the center of the new jar. Melt the shavings in a double boiler on low heat. (I used a milk pot.) Pour the melted wax into the jar. Only pour to the top of the candle. Extra wax can be poured into another jar for another candle if you have access to wicks.
Stick the new candle in the fridge (not freezer) to cool.


5 comments:
Great idea. I have a candle making kit, but my scents have lost their smell. Anyone have suggestions on homemade scents?
Thanks, Charity, great idea! I'm not sure how to make homemade scents, but you might try some drops of essential oils?
If you place a broken glass candle in the freezer for several hours, the candle will pop right out of the glass container without having to smash the container more. You can also use this tip to get the melted wax out of your candle holders once your candles are all burned up. Save the wax to make a candle.
I will have to give that a try, Shelley! Thanks for sharing! :-)
When I transferred the candle from it's broken holder/container into a new one I place it on a cookie sheet and put it in a warm oven for about 10 minutes. Got to keep a close eye on it because the melting time varies with each candle. This oven melting method works well for those candles that burn the wick and center faster than the outside edges. I replace the old wick with a new one and let the wax melt around it. The scent of scented candles can linger in the oven so you'll want to wait awhile before using your oven for baking.
Post a Comment