Showing posts with label By Dee Dee. Show all posts

Tuesday, October 11, 2016

Chicken Cordon Bleu Lasagna


This Chicken Cordon Bleu Lasagna was originally posted here. I have been wanting to make Chicken Cordon Bleu but am trying to get away from some of my more time consuming meals since making everything from scratch demands lots of time in the kitchen as it is! For me, using lasagna noodles that do not require pre-cooking can help cut the time required to make this meal down and I making it into a lasagna makes it a more filling meal for my two teenage boys who simply can't get enough food!


Cordon Bleu 


Ingredients:

9 lasagna noodles, cooked according to package directions (I use the kind that does not require pre-cooking)
4½ cups cooked and chopped chicken, grilled or rotisserie chopped
1½ cups cooked and diced ham
1½ - 2 cups cooked and chopped bacon
3 cups Swiss cheese, grated ( I use Gouda or Tilster as Swiss is not easily available for me)

SAUCE
½ cup butter
½ cup flour
4 cups milk
1 teaspoon garlic powder
1 teaspoon garlic salt
½ teaspoon salt
¼ teaspoon white pepper
16 ounces cream cheese, softened

Instructions:
In a large saucepan melt butter and add flour. Cook for 1 minute and then slowly add milk. Add garlic powder, garlic salt, salt and pepper. Stir with a whisk and bring to a boil over medium high heat. Stir in cream cheese and continue to stir until smooth. Remove from heat.
Preheat oven to 160 degrees Celsius (350 degrees F).
Spray a 9x13 inch baking dish with cooking spray or grease lightly with margarine.

TO ASSEMBLE:
Place 3 lasagna noodles on the bottom of the pan.
Layer ⅓ of the chicken over the noodles.
Next layer ⅓ of the ham.
Pour ⅓ of the sauce over the ham.
Next sprinkle ⅓ of the cheese over the sauce
Finally sprinkle ⅓ of the bacon over the cheese.
Repeat 2 more times.
Bake at 160 degrees C (350 degrees F) for 45 to 60 minutes.


Wednesday, October 5, 2016

Leaving the nest to study in a "foreign land"

I started this blog post a month ago, however, due to my own daughter embarking on her own journey of heading off to college as an MK, our lives came to a stop. We concentrated much on getting her ready for the big changes that were approaching quickly. Going off to college is a big event in any young person's life but as an MK leaving the nest to study in a foreign land which everyone around them would consider to be their "home", it poses an even greater life change.

We praise the Lord that in our situation with our daughter heading off to college, many tears were shed by nationals who dearly loved her and could almost not bear to say goodbye to her. She is missed tremendously, not only by her family, but by those for whom she was burdened and desired to see come to Christ; by her Christian brothers and sisters in Christ who loved her sweet spirit and enjoyed sweet fellowship with her over the years.


Teens who have become friends.

Other MKs, some of whom have known her all their lives.

Children who love and admire her.

And most of all, special "Grandparents" who have been a "ministry" of our daughter's, for years.

Some people who have never had to leave their children so far away from home do not and will not understand what our families experiences as their children grow up and move on to college in their "foreign" homeland. With these posts we hope to shed some light for those who do not realize how much this change affects these families and help those families who are about to embark on this journey by providing personal experiences, sound advice, and helps to make the MK college transition much smoother for both students and families.

As we begin this new theme for weekly posts, we would like to start out by introducing a new idea here on the BMW blog. I asked the BMW ladies some weeks ago to send me a list of their children who were attending colleges throughout the US this fall semester 2016. My goal was to have their names listed together somewhere so we could all more easily pray for them and the parents. Another wish of mine was to be able to ask you, our readers, to "adopt" an MK college student for this fall semester. I am talking, of course, about those readers who live in the United States. One of the favorite things to receive as a college student is mail and care packages. But, being away on a foreign field makes sending care packages to your children a little more challenging. Chocolate chip cookies that have traveled across the Atlantic just don't taste as fresh! Know what I mean?!
This gives you the opportunity to be a blessing to an MK and help support them through the tough transition into college life and moving back to the US.

For privacy's sake, we will not post the names of the students publicly here on this blog. However, if you are interested in "adopting" an MK, please feel free to contact me through Facebook Messenger or by e-mail (danddsterling@juno.com) and I will get you connected with an MK. If you share what state you are in, I might even be able to locate a student who would be within driving distance of you which would make it even easier to be an encouragement to them. I am so excited about these posts and especially this part of seeing our readers be a blessing to our children in our absence. May God bless you richly for your participation!


Tuesday, October 4, 2016

Roasted Cauliflower Recipe


Ingredients:
Cauliflower florets (you can buy them already cut or buy a whole one and cut it yourself)
Olive oil (enough to lightly coat the cauliflower)
Salt, to taste
Pepper, to taste
Other seasonings (optional)

Directions:

Preheat your oven to 425 degrees.

In a large bowl, mix the cauliflower florets, olive oil, salt, pepper, and any other seasonings you want to add. Place the florets on a cookie sheet so that none of the pieces of cauliflower are touching each other. Bake for around 25 – 35 minutes until part of the cauliflower florets are a nice golden brown. You can make them as dark or as light as you want them.

http://www.survivingthestores.com/roasted-cauliflower.html

Monday, June 20, 2016

Red Party Punch Recipe


Missionaries can often be found planning parties for baby showers, wedding showers, their own children's birthday parties, etc. For quite some time, I have been on the hunt for a good punch recipe which does not require many special ingredients so that it can be made on the field. With the need to plan a high school graduation reception for our daughter, I was happy to find an easy punch recipe that everyone enjoyed. I tweaked the recipe a bit from the original recipe I found online so that is the version I will share here. It reminds me of red Hawaiian punch to give you an idea of the flavor of the finished product.

Just a stock photo. :)


Ingredients:
Better to allow the ingredients to chill a few hours before mixing. 

8 cups orange juice (2 liters)
8 cups pineapple juice (2 liters)
2 cups grapefruit juice or grapefruit lemon juice blend
1/2 liter of Grenadine
1 (10 ounce) jar maraschino cherries (optional: we did not use the cherries)
1 (2 liter) bottle Sprite


Combine the ingredients into an 8.5 or larger punch bowl. Stir lightly and serve!


Tuesday, June 14, 2016

Chunky Homemade Peanut Butter


Yield: About one jar of chunky peanut butter

Ingredients

4 cups (1 lb.) roasted, unsalted peanuts - divided
1 teaspoon honey
1/2 tsp. salt
1-2 Tbsp. canola or peanut oil (Optional - it makes the peanut butter much easier to spread after it has been refrigerated)

Instructions:

1. Blend 3 cups of the peanuts in a food processor for up to 10 minutes, until the peanut butter is very creamy and well-blended.
2. Roughly chop the remaining one cup of peanuts.
3. Mix in the one cup of roughly chopped peanuts, oil, honey, and salt. Adjust to taste.

Enjoy!

Note: If you prefer creamy peanut butter you can process all four cups of the peanuts in the food processor. The amount of honey are salt are adjustable, so feel free to add more or less to change the sweetness or saltiness of the peanut butter.

Wednesday, June 1, 2016

VBS Program (Science Theme) "Laboratory of Fun" - Day One


Last week I shared with you the weekly "Laboratory of Fun"  Science theme for a one week long VBS program. This week I wanted to look specifically at Day one of that same week to share the schedule and day's activities to give you a better idea of how to fill the time for each day.

First we begin with Registration. The kids come up to the tables which is labeled for their ages. We split our kids up from ages five to eight (younger) and nine to ninety-nine (just for fun). When they approach the tables we ask for their names and confirm correct spelling. We use a simple form that I designed to keep track of their attendance. On the second and following days, we will use that chart to track their points for: attendance, verses memorized, papers completed and brought back the next day, friends invited, and participation. We do not hand out the point cards on the first day because they are not needed until the second day.

Registration

We gather all the children together for prayer. At that time I introduce the point system and theme for the week.


Once the points are explained, I announce that the older kids will be walking to the last set of benches to hear the Bible story from my husband while the younger group of children simply move closer together to hear the Bible story from me. We have a set time for the lesson so we try to keep the time the same in order for both groups to be ready to move on to the review game. Sometimes the older group goes longer so I stall the younger ones with songs and crazy stories or questions. :)


Dee teaching the smaller age group.

Don't  you love our flannel graph holder? :)


David teaching the older age group.
***The exception from the norm for this Science themed VBS was that instead of a review game right after the Bible stories, we did the science experiments first to allow the lesson in the experiments to also be used for review.


The children were looking forward to something new and exciting to watch when it was time to gather around for the experiment. 


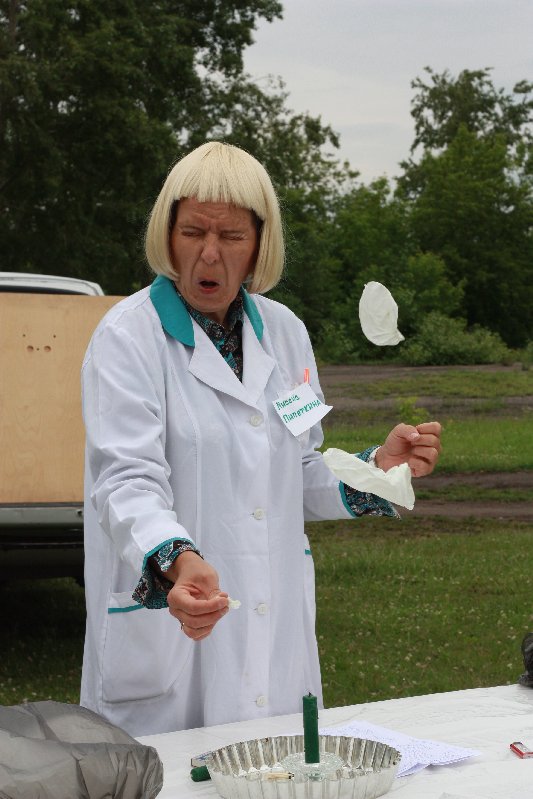
This experiment can be described in detail here but these photos just have to be shared! Mrs. Pipetkina has a fear of balloons. So, this first experiment was a challenge for her to have to pop THREE balloons on purpose! We even offered to pop them for her since David understands her fear (hmm, his wife has the same "strong dislike" for balloons!) but she promised to be brave. She did great! Best of all were her faces as each balloon popped!


Sin separates us from God.


Can you help me put the balloon back together?


But, John 7:38 says, " He that believeth on me, as the scripture hath said, out of his belly shall flow rivers of living water."


Both water and salvation are priceless and free. 
Both are available to everyone!


The balloon filled with water does not pop, but is protected, when it is exposed to open flame.

As is the person who puts his/her faith in Jesus Christ!


The experiment went well! The children understood and were amazed that the water balloon did not pop!

Next on the schedule, review game time!


While one of my helpers is playing the review game with the kids, several other helpers are setting up for snacks and Kool-Aid for our break time.
Once the review game is done, we pray for snack time and the children have about ten to fifteen minutes to eat. During their break, we would gather their point cards (that they wear around their necks) and put them away for the day in preparation for game time. The children are left with a stretchy colored wrist band to distinguish which team they are on so the cards are able to not be a safety hazard and get in the way while they try to play games.

I plan on saying more about point cards and games but I will share for you what games we played for this particular day.

The first game required the kids to hold each other at the elbow and without breaking the chain, get their bodies through the hula hoop and on down the line.


There are usually a few clowns in the group but this little guy just made us laugh with his funny faces while he concentrated on getting through that hula hoop!


The next game was a bit of a risky one on our part but we saw this game played at a good friend's son's birthday party and it was a lot of messy fun!

We did a little simpler version where the kids stand in line, each team having two players (one on each side of the table) blindfolded and ready to dig into a jello and whipped cream pie with their hands! Inside the pie were gummy worms, rice, and beans. The goal was for the children to find as many beans as they could, pull them out of the pie mess and onto the tablecloth in 30 seconds. The team with the most beans found wins!


I gave the instructions and my husband made sure to taste test the whipped cream just in case it was bad! ;)

The beautiful pies!

And their off!


Okay, so the risk was worth taking! They LOVED this game! Girls and boys alike!


We have a set time for games that determines how many we are able to play each day. If two games take up the entire time allotted for games then we stick with our time frame, although we try to have three games each day. 
At the end of the games we gather the kids all back together again to remind them to invite their friends. We also hand out their homework sheets for points as well, reminding them that the points they earn through the week will be like money to spend in the "store" on the last day. We then gather up their wrist bands, close in prayer, and they are free to go home. Some stay after to play soccer with some of the VBS workers. :)
Whew! 
Our program lasts two hours and it is a packed two hours with no time in between activities for them to wander off. This year the first few days felt like the two hours was more like 30 minutes! The time seemed to pass so quickly from start to finish! 


Wednesday, May 25, 2016

VBS Program (Science Theme) "Laboratory of Fun" - Daily Themes and Lessons

Now that we have discussed the planning stages of a Vacation Bible School program, I wanted to share what I believe was one of our favorite (if the kids could vote) VBS themes from 2013. I had been looking over different ways to incorporate science experiments into our VBS program as a way to really get the kids' attention and help them "see" the Bible lessons we are trying to teach them. Using these Bible stories along with the experiments from Mad About Jesus, was a great success! These experiments are a lot of work to gather and prepare for each day but they add so much to your program and the looks on the kids' faces definitely are only one reason they are more than worth it!


Theme for the Week: Laboratory of Fun
Goal: To use science experiments as visual reinforcement to the daily Bible lessons.

First you will need a Professor to do the daily experiments.

We asked a lady who attended our services if she would be our Professor and perform the science experiments each day. Please meet "Mrs.'Pipetkina' - (taken from the word 'pipette') 
It was a great experience for her to help out and gain this experience. She and I spent much time together praying for each lesson as we gathered together daily over several days to translate the experiments into Russian. Each day I stood by her to help in case she needed something and to hold up verses which we had printed out that went along with the experiment.


Day 1: Theme: Sin separates us from God but by accepting Him as our personal Savior we can receive forgiveness of our sins. 
Story: Samaritan woman at the well
Verses: John 4:1-30, 39-42
Science Experiment:  - Object Lesson 1: "One Sin"


Day 2: Theme: We are saved by faith, not our good works.
Story: Pharisee and the Publican 
Verses: Luke 18:9-14


Day 3: Theme: Through Christ we can do all things.
Story: Peter walks on the water
Verses: Matthew 14:22-33
Science Experiment: Object Lesson 12: "Leap of Faith"

 THIS was a lot of work but a HUGE hit with the kids!
Even some of the adults wanted to "walk on the water".


Day 4: Theme:He will strengthen us if we ask Him in prayer.
Story: David and Goliath
Verses: I Kings 17
Science Experiment: Object Lesson 2: "Even Little People Can Do Big Things"


NO PHOTOGRAPHER MEANS NO PICTURES FROM DAY FOUR. (Insert sad face)

But, I will take this time to show you an amazing photo booth another missionary painted for our special VBS week. Isn't it awesome!?


Day 5: Theme: Christ died for us because He loves us.

Story: Philip and the Ethiopian Eunuch - 

Verses: Acts 8:26-40


 This was the greatest object lesson of the week which made it perfect for the final day's experiment. A great illustration that had passersby stopping to watch to see what happened.


We pray this post is a help and encouragement to you as you prepare for upcomingVBS programs in your area of the world. We would love to hear from you if you use any of these ideas.

Please feel free to leave any questions in the comments!


Tuesday, May 24, 2016

Russian pancakes (blinchiky)


I had tried and tried to make "blinchiky" the way friends give me the recipe (just throwing the ingredients into a bowl and not really measuring any of them) but I could not get them to turn out. I ended up spending way too much time making a mess of batter in a skillet. Frustrating! I just knew it didn't take that long to make these thin little 'pancakes' and set out to find a recipe. I ended up trying this crepe recipe which turned out wonderfully! They were thin, easy to cook and flip in the skillet and tasted great. So, I use this recipe below to make 'blinchiky'. This recipe is way more fool-proof than guessing at the ingredients each time. 


1 1/2 cups milk
 2 tsp. vanilla extract
3 large egg yolks 
2 tsp. sugar 
1 TBSP salt 
5 TBSP butter, melted plus more for pan
1 1/2 cups sifted all-purpose flour 

1. Whisk together milk, vanilla, yolks, sugar, salt, and butter until well combined. Slowly whisk mixture into flour until smooth. Transfer to an airtight container; refrigerate at least two hours or overnight. 

2. Once the batter has set and you are ready to fry them, lightly coat a 6 -1/2 to 7-inch crepe pan or non-stick skillet with butter. Place over medium heat until just starting to smoke. Remove from heat; pour 2 to 3 tbsps of batter quickly into center of pan. quickly tilt pan and swirl in all directions so batter covers bottom in a thin layer. Return pan to heat; cook until center is dry, about 1 minute. Jerk pan sharply back and forth to loosen blinchik. 

3. Lift edge of blinchik; when underside is golden brown, flip with your fingers or two spatulas. Cook until top is brown in spots, about 30 seconds more. Slide onto plate. 

4. Coat pan with butter again and repeat with remaining batter. layering blinchiky on a plate. To keep warm, cover with an inverted oven-proof dish and place in a 200 degree C oven.

Russian people love to eat blinhiky with different fillings, including everything from 'varenya' (fruit jams) to chicken and mushrooms. So, choose your filling or just scarf them down by the handfuls like my teenage boys do! :) However you like to eat them, enjoy! I would love to hear what are some of your favorite filings!


Wednesday, May 18, 2016

Vacation Bible School - Using a Point System (re-post)


Hello again! If you are dropping in this week we are talking about a great way to use a point system and keep track of it throughout the week of your Vacation Bible School program. 

I can tell you that every day of every VBS program we have held, the day's activities begin with a registration time. We set up two tables labeled for each age group - one for the younger children (ages up to 8) and one for the older children (ages 9 and up). This 30-45 minutes is the time when as the children arrive they can report to the registration tables, giving us their name, worksheet from the previous day, quote their Bible verse, and report/register any visitors they invited and brought with them for that day. 


One of the first things to consider is how YOU will keep track of attendance and  of how many points each child earns throughout the week. 

Here is a basic chart that I designed to fit our VBS point system. It is basic but it works for me! One added advantage that I had was obtaining a list of students from the local school so that I could enter in the children's names even before we held our first VBS. This saved us time by not having to write all of their names in each year. 


As you can see there are the point categories for Attendance, Bible Verse, Activity Sheet, Visitor, and Participation. I also added a "Note" section to the far right for any additional information including the name of their visitor so we can be sure everyone is counted for and points are awarded to those who invited them.


We print up two copies of these sheets - one for the younger age group and one for the older age group. I take these sheets home at the end of each day and use them in tallying the daily points to be punched onto the children's point cards.

As you can see in this photo below, each child is wearing a card that corresponds to his team color (we usually divide the children up into two teams.) At the top of the card is a place for the child's name. Then below the name are "point stars" of (in this case) 10 points value each. Each day the child attends VBS, he is  given this card to wear for the day until game time so that he too can see his progress and be excited about how many points he earns throughout the week. Let me add that the children only receive these cards beginning on the second day. Everyone who comes for the first time (no matter what day) receives points for attendance, Bible verse, and the activity sheets. We do this to give those who can only attend one day a few points to be able to purchase something from the "store" at the end of the week.


Each day during snack time, we gather these point cards, and I take them home to use a hole puncher and punch the points on each card once I have tallied the child's points for each day. It is a bit time consuming, but I think it is important to do things orderly, and it is also so exciting for the kids each day to see more holes punched in their point cards!

The last day is quite busy as you must take time during the day's activities to add up the rest of the points earned from that last morning's registration and add it into the totals. That way the children have all of their points tabulated and you can reward those who invited the most guests, memorized the most verses, and then give them ALL of their points to spend in the "store"!

VBS 2010 - Some of the children with prizes they bought with their points

Please let me know if you have any questions or would like me to better explain some aspect of these posts so far about planning a VBS program. I look forward to hearing from you!